
All You Need to Know About the Karcher Window Vac: Common Questions Answered
The Karcher Window Vac is a popular cleaning tool that has revolutionized the way people clean their windows. With its ability to vacuum up water and leave windows streak-free, it’s no wonder that many households have adopted this device as a staple in their cleaning arsenal.
However, with its rise in popularity comes a slew of questions from potential and new users.
This article aims to answer some of the most common questions about the Karcher Window Vac, providing a comprehensive guide for anyone looking to understand and maximize the use of this innovative product.
Table of Contents
What is the Karcher Window Vac?
The Karcher Window Vac is a handheld, battery-operated device designed to clean windows and other flat surfaces efficiently.
It works by sucking up liquid, thus removing dirt, grime, and excess water, and leaving the surface clean and streak-free.
The device typically comes with a spray bottle and microfiber cloth for applying and scrubbing the cleaning solution before vacuuming it up with the Vac.
What Surfaces Can the Karcher Window Vac Clean?
While primarily designed for windows, the Karcher Window Vac is versatile and can be used on a variety of surfaces, including:
- Glass doors
- Mirrors
- Tiles
- Shower screens
- Car windows
- Tabletops
- Any smooth, flat surface
This versatility makes the Karcher Window Vac a handy tool for various cleaning tasks around the home and beyond.
How Long Does the Battery Last?
The battery life of the Karcher Window Vac varies depending on the model. On average, a fully charged Karcher Window Vac can run for about 20 to 35 minutes. The WV6 can last up to a massive 100 minutes on one charge!
This duration is typically sufficient to clean several windows or surfaces in one session. Some models also feature a battery level indicator, so you can easily see when it’s time to recharge.
There is a useful comparison table showing the battery life across each of the Karcher window vac models here : Comparison of Kärcher WV1, WV2, WV5 and WV6 Window Vacuums
How Long Does it Take to Charge?
Charging times also vary by model, but most Karcher Window Vac units take around 2 to 3 hours to fully charge. It’s advisable to charge the Vac after each use to ensure it’s always ready for your next cleaning session.
Is the Karcher Window Vac Easy to Use?
One of the main selling points of the Karcher Window Vac is its ease of use. The device is lightweight and easy to maneuver, reducing hand and arm fatigue.
It also has very straightforward controls, even those new to the device can quickly learn how to use it. Features like an ergonomic handle, easy-to-empty water tank, and battery level indicator enhance the user experience.
How Does the Karcher Window Vac Work?
The Karcher Window Vac operates in a few simple steps:
- Spray: Apply a cleaning solution to the window using the included spray bottle. This is an optional step, often spraying isn’t required.
- Scrub: Use the microfiber cloth attached to the spray bottle to scrub away dirt and grime. Again, this is often an optional step – you can get straight to the vacuuming!
- Vacuum: Turn on the Window Vac and run the suction head along the wet surface. The Vac sucks up the liquid, leaving the surface dry and streak-free.
The device’s key feature is its powerful suction mechanism, which efficiently removes moisture and dirt, preventing streaks and watermarks.
How Do I Maintain My Karcher Window Vac?
Proper maintenance ensures the longevity and optimal performance of your Karcher Window Vac.
Here are some maintenance tips:
- Empty the Water Tank: After each use, empty the dirty water tank to prevent mold and unpleasant odors.
- Clean the Suction Head: Wipe the suction head and blades to remove any residue or buildup.
- Charge the Battery: Regularly charge the battery to maintain its health and ensure the Vac is always ready for use.
- Check for Wear and Tear: Inspect the blades and other components for signs of wear and replace them as needed.
Can I Use My Own Cleaning Solution?
Yes, you can use your own cleaning solution with the Karcher Window Vac.
However, it’s essential to choose a solution that is safe for use on glass and won’t damage the device.
Karcher also offers its own range of cleaning solutions designed specifically for use with the Window Vac, which ensures compatibility and optimal results. Here are a couple of the options for you to try :


What Are the Different Models Available?
Karcher offers several models of the Window Vac, each with its unique features and specifications. Some popular models include:
- Kärcher WV 1: The basic model, suitable for small to medium-sized cleaning tasks.
- Kärcher WV 2: A mid-range model with a longer battery life and additional accessories.
- Kärcher WV 5: The premium model with an interchangeable battery system, extended battery life, and enhanced features.
- Kärcher WV 6: The WV6 is the flagship model in Kärcher’s window vacuum range, boasting advanced features and superior performance.
Each model caters to different needs and budgets, allowing users to choose the one that best fits their cleaning requirements.
You can learn all about the different Karcher Window Vac models here : Comparison of Kärcher WV1, WV2, WV5 and WV6 Window Vacuums and A Comparison of the Kärcher Window Vacs – which is best?
You can purchase all of the Window Vacs we have discussed here :


What Accessories Are Available for Kärcher Window Vacs?
Karcher provides a range of accessories to complement the Window Vac and enhance its functionality, including:
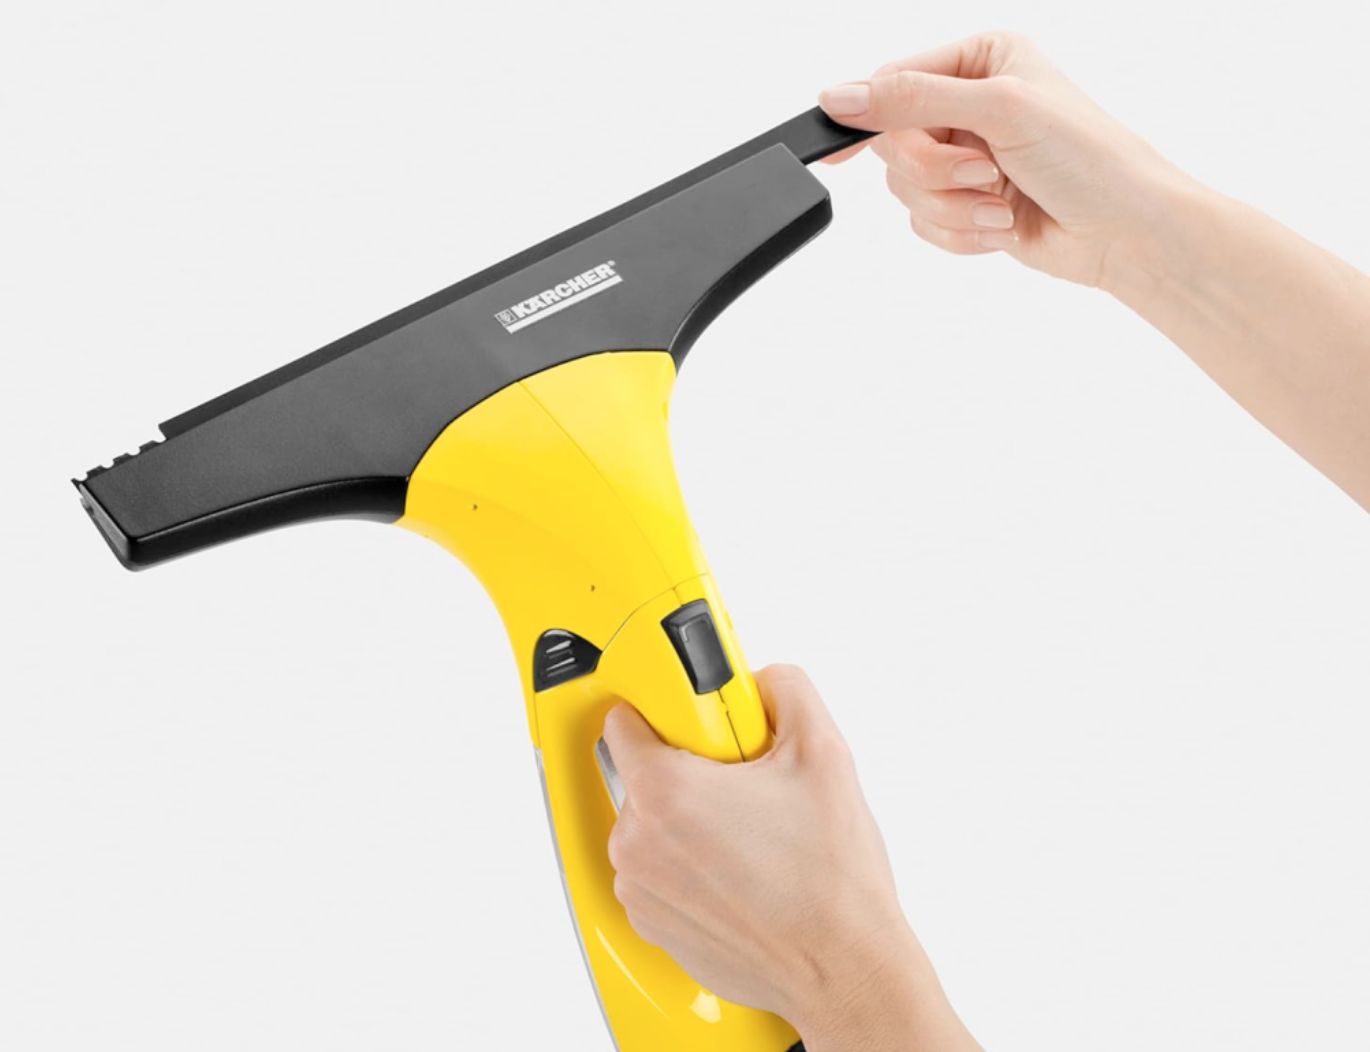
Replacement Blades: For maintaining streak-free performance.


Rubber lips : From time to time, it is necessary to replace the rubber lips of your Kärcher window vac. The replacement rubber lips are inexpensive to purchase and improve the performance of your vacuum.

Extension Poles: For reaching high windows and hard-to-reach areas.


Microfiber Cloths: For effective scrubbing and cleaning.
Spray Bottles: Additional or replacement bottles for applying cleaning solution.

Suction Nozzles : While the standard suction nozzle that comes with the window vacuum is highly effective in most situations, upgrading to a specialized nozzle can further enhance its performance.


Battery Packs: Extra batteries for extended cleaning sessions.


You can learn more about the Karcher Window Vac accessories here : Kärcher Window Vacs: Essential Accessories
How do I get the best results from my Karcher window vac?
To achieve the best results with your Karcher Window Vac, follow these steps and tips:
Preparation
- Charge the Battery Fully: Ensure your Karcher Window Vac is fully charged before use. A fully charged battery typically provides 20 to 35 minutes of cleaning time, depending on the model.
- Clean the Blades: Make sure the rubber blades are clean and free from any dirt or debris that could cause streaks.
- Choose the Right Cleaning Solution: Use a suitable glass cleaning solution. Karcher offers its own brand of cleaning solutions, but other glass cleaners can also work well.
Cleaning Process
- Spray the Solution: Apply the cleaning solution to the window using the spray bottle. Be sure to cover the surface evenly.
- Scrub the Surface: Use a microfiber cloth or the cloth attachment on the spray bottle to scrub the window, loosening any dirt or grime.
- Use the Window Vac: Turn on the Karcher Window Vac and start from the top of the window, working your way down. Keep the rubber blade in contact with the glass and move slowly to ensure all moisture is vacuumed up.
- Overlap Passes: Slightly overlap each pass to ensure no areas are missed and to avoid leaving streaks.
- Wipe the Blades: After a few passes, wipe the rubber blades with a clean, lint-free cloth to remove any dirt or water residue that could cause streaks.
Additional Tips
- Work in Small Sections: Clean smaller sections of the window at a time to prevent the cleaning solution from drying out before you vacuum it up.
- Check the Weather: Avoid cleaning windows in direct sunlight or on very hot days, as the cleaning solution may dry too quickly, causing streaks.
- Clean the Vacuum Regularly: After each use, empty the dirty water tank and clean the suction head and rubber blades. This helps maintain optimal performance and prolongs the life of the device.
- Use Extension Poles for High Windows: If you’re cleaning tall windows or hard-to-reach areas, consider using an extension pole designed for the Karcher Window Vac.
By following these steps and tips, you can achieve professional, streak-free results with your Karcher Window Vac, keeping your windows sparkling clean with minimal effort.
What does flashing green light mean on Karcher window cleaner?
A flashing green light on a Karcher Window Vac typically indicates a charging issue or that the device is in need of charging.
Here’s a more detailed breakdown of what the flashing green light could signify:
Charging Mode: When you connect your Karcher Window Vac to the charger, the green light may flash to indicate that the battery is currently charging. Once the battery is fully charged, the light usually changes to a steady green.
Battery Low: If the green light starts flashing while you are using the device, it generally means that the battery is running low and needs to be recharged soon.
Steps to Resolve Flashing Green Light
- Check the Charger Connection: Ensure that the charger is properly connected to both the device and the power outlet. A loose connection can prevent the device from charging properly.
- Allow Full Charge: Let the device charge uninterrupted until the green light stops flashing and becomes steady, indicating a full charge.
- Inspect the Charging Cable and Adapter: Check for any visible damage to the charging cable or adapter. If either is damaged, replace them with appropriate Karcher accessories.
- Cool Down the Device: If the device feels hot, let it cool down before attempting to charge it again. Sometimes, overheating can cause the charging process to malfunction.
- Battery Health: If the flashing green light persists even after following the above steps, the battery may be defective or nearing the end of its lifespan. In such cases, consider contacting Karcher customer support for further assistance or battery replacement.
How Do I Prevent Streaks?
Achieving streak-free windows is one of the primary goals of using the Karcher Window Vac.
Here are some tips to prevent streaks:
- Use the Right Amount of Cleaning Solution: Avoid using too much solution, as excess liquid can cause streaks.
- Wipe the Suction Head Regularly: Clean the suction head blades frequently to remove any buildup that can cause streaks.
- Work in Sections: Clean small sections at a time to ensure thorough cleaning and drying.
- Overlap Strokes: Overlap your strokes slightly to ensure no area is missed.
How do you know when the Karcher window vac is fully charged?
When the Karcher Window Vac is fully charged, the indicator light will change from flashing to a steady green light.
Here’s a step-by-step guide on how to know when your Karcher Window Vac is fully charged:
Charging Process
- Connect the Charger: Plug the charger into the power outlet and connect it to the charging port on the Karcher Window Vac.
- Initial Indicator: When you first connect the charger, the green light on the device will start flashing, indicating that the charging process has begun.
- Charging Duration: Depending on the model and the battery’s initial charge level, it may take approximately 2 to 3 hours to fully charge.
- Full Charge Indicator: Once the battery is fully charged, the green light will change from flashing to a steady, solid green light.
Steps to Ensure Proper Charging
- Stable Connection: Make sure the charger is securely connected to both the power source and the device.
- Monitor the Light: Periodically check the green light indicator to see when it changes to a steady green.
- Unplug After Full Charge: Once the light is solid green, unplug the charger to prevent overcharging, which can prolong battery life.
Tips for Optimal Battery Maintenance
- Regular Charging: Charge the device after each use to keep it ready for the next cleaning session.
- Avoid Deep Discharges: Try not to let the battery run completely flat before recharging, as this can help maintain battery health.
- Store Properly: Store the Karcher Window Vac in a cool, dry place when not in use, and avoid exposing it to extreme temperatures.
Can you replace the battery of a Karcher window Vac?
The ability to replace the battery of a Kärcher Window Vac depends on the specific model you own.
Here’s a general overview of the battery replacement options for Kärcher Window Vacs:
Kärcher Window Vac Models with Replaceable Batteries
Some Kärcher Window Vac models come with replaceable batteries. For these models, you can purchase a new battery and replace it when the old one no longer holds a charge.
The WV 2, WV 2 2nd, WV5, WV 5 Plus, WV 5 Premium allow you to replace the batteries.
Kärcher Window Vac Models with Non-Replaceable Batteries
The WV 1 Kärcher Window Vac model has an integrated battery that is not designed to be user-replaceable. For this model, if the battery no longer holds a charge, you may need to contact Kärcher customer service or an authorized service center to discuss repair or replacement options.
Steps to Replace the Battery (if applicable)
If your Kärcher Window Vac model supports battery replacement, follow these general steps:
- Turn Off and Unplug: Ensure the device is turned off and unplugged from any power source.
- Access the Battery Compartment: Locate the battery compartment. This is usually found on the back of the device or under a removable panel.
- Remove the Old Battery: Carefully remove the old battery by disconnecting any connectors or releasing any latches holding it in place.
- Insert the New Battery: Connect the new battery, ensuring it is properly aligned and secured. Reattach any connectors and close the battery compartment.
- Charge the New Battery: Fully charge the new battery before using the device to ensure optimal performance.
Can you use a Karcher window vac upside down?
Using a Karcher Window Vac upside down is generally not recommended for several reasons:
Reasons Not to Use the Karcher Window Vac Upside Down
- Water Ingress: The Karcher Window Vac is designed to collect water into a tank that relies on gravity. Using the device upside down can cause water to flow back into the motor and electrical components, potentially causing damage.
- Reduced Efficiency: The suction mechanism is optimized for upright or slightly angled use. Turning the device upside down may reduce its effectiveness in picking up water and leave streaks on the surface.
- Spillage Risk: The dirty water collected in the tank may spill out if the device is turned upside down, leading to a mess and potential damage to the interior components.
Recommended Use
For optimal performance and to prevent damage, the Karcher Window Vac should be used in an upright or slightly angled position.
Here are some tips for cleaning hard-to-reach areas without turning the device upside down:
- Extension Poles: Karcher offers extension poles that can help you reach high windows or awkward angles without having to tilt the device improperly.
- Manual Adjustment: For areas that are challenging to clean with the standard approach, you can manually adjust your position or use a step ladder to maintain the proper orientation of the Window Vac.
- Small Sections: Clean smaller sections at a time to ensure thorough coverage and avoid the need to tilt the device excessively.
Can I use washing up liquid in a Kärcher window vac?
Yes, you can use washing up liquid (dish soap) with your Kärcher Window Vac, but it’s important to use it correctly to avoid any potential issues.
Here’s a guide on how to do it:
Using Washing Up Liquid with a Kärcher Window Vac
- Prepare the Solution:
- Mix a small amount of washing up liquid with water in a spray bottle. Use only a few drops of the liquid to avoid creating too many suds, which can leave residue on the windows.
- Shake the spray bottle gently to mix the solution thoroughly.
- Apply the Solution:
- Spray the prepared solution onto the window surface. Ensure an even coating across the glass.
- Scrub the Window:
- Use a microfiber cloth or the cloth attachment on the Kärcher spray bottle to scrub the window, loosening any dirt and grime.
- Use the Window Vac:
- Turn on the Kärcher Window Vac and use it to vacuum the water and cleaning solution off the window. Start at the top of the window and move downwards, overlapping your passes slightly to ensure thorough cleaning.
Tips for Best Results
- Avoid Excessive Suds: Too much washing up liquid can create excessive suds, which might leave streaks or residue on the glass. Use a minimal amount for the best results.
- Rinse If Necessary: If you notice any soapy residue after using the window vac, you can rinse the window with clean water and use the vac again to remove the excess water.
- Regular Maintenance: Clean the rubber blades and empty the dirty water tank regularly to maintain the effectiveness of the window vac and prevent streaks.
Alternative Cleaning Solutions – Kärcher’s own brand of cleaning solution
While washing up liquid can be used in a pinch, for optimal results, consider using a dedicated glass cleaner or Kärcher’s own brand of cleaning solution. These products are specifically formulated to work with the window vac and can provide streak-free results more consistently.
Can I use a window vac for condensation?
Yes, you can use a window vac to effectively deal with condensation on windows. A window vac, such as the Kärcher Window Vac, is designed to vacuum up liquid, making it an excellent tool for removing condensation quickly and efficiently.
Can you use Kärcher window vac on shower screens?
Yes, you can use a Kärcher Window Vac on shower screens. In fact, it is an excellent tool for keeping shower screens clean and free of water spots, soap scum and limescale.
Does a window vac help with mould?
A window vac can help with mold prevention and control, but it is not a complete solution for mold removal.
Here’s how a window vac can be beneficial and what additional steps you might need to take to address mold effectively:
How a Window Vac Helps with Mold
- Moisture Removal: Mold thrives in damp environments. A window vac is effective at removing moisture from windows, tiles, shower screens, and other surfaces. By keeping these areas dry, you reduce the likelihood of mold growth.
- Condensation Control: Regularly using a window vac to remove condensation from windows and other surfaces can help prevent the conditions that favor mold development.
- Cleaning Assistance: When used in conjunction with mold-cleaning solutions, a window vac can help remove the water and cleaning solution mixture efficiently, ensuring surfaces dry quickly and reducing the risk of mold spores taking hold again.
You may be interested to read our guide on how to tackle mould / mold in your home : How to Tackle Mould in Your Home
Conclusion
The Karcher Window Vac is a powerful and versatile tool that has simplified the task of window cleaning for many households.
By understanding how to use and maintain the device, you can ensure optimal performance and longevity.
Whether you’re considering purchasing a Karcher Window Vac or already own one, this guide aims to answer your questions and help you get the most out of this innovative cleaning tool.
With its ability to deliver streak-free, sparkling clean windows and surfaces, the Karcher Window Vac is indeed a game-changer in the realm of household cleaning.
You may also be interested in
A Comparison of the Kärcher Window Vacs – which is best?
Review: Kärcher WV 2 Plus Window Vac (and a comparison to Kärcher WV 1)
Kärcher WV 1 Window Vac: A Comprehensive Review
Comparison of Kärcher WV1, WV2, WV5 and WV6 Window Vacuums
Kärcher Window Vacs: Essential Accessories
Our Comparison of Bosch GlassVac vs the Kärcher Window Vacs
Review : Mr. Muscle Drain Unblocker Sink & Drain Cleaner
Review: Dr. Beckmann Upholstery Stain Remover
A Guide to Choosing the Best Toilet Brush
A Comprehensive Guide to Innovative Toilet Paper Storage Solutions
Dialin’s Essential Oil Diffuser: Product Review
Review: Dettol Anti-Bacterial Mould and Mildew Remover
How to Clean Your Microwave: Tips and Techniques for a Spotless Appliance
The Best Easy-to-Read Wall Clocks for Your Home
How to make your bathroom smell like a spa: Aromatherapy Tips and Techniques
The Best Modern Wall Clocks: Minimalist, Retro, Tech-Infused, Statement & Artistic designs
How to Tackle Mould in Your Home
Best Sofa Designs for Small Living Rooms
Mirrors for Your Living Room Wall

Leave a Reply