
How to create a gallery wall in your Home
Creating a gallery wall is an great way to add visual interest into your space.
Whether you’re an art enthusiast, a photography lover, or simply aiming to create an attractive display, a thoughtfully curated gallery wall can be a fantastic focal point.
Here’s a guide on how to create a stunning gallery wall step by step.
Table of contents
- How to create a gallery wall in your Home
- What is a Gallery Wall?
- Why Create a Gallery Wall?
- Planning Your Gallery Wall
- How do I choose a theme for my gallery wall?
- Things you need to Create a Gallery Wall
- How to Create Your Gallery Wall
- 15 Best Gallery Wall Ideas for Your Home
- 1. Black and White Photography Gallery
- 2. Eclectic Mix of Art and Photography
- 3. Minimalist Gallery Wall
- 4. Travel-Themed Gallery Wall
- 5. Vintage-Inspired Gallery Wall
- 6. Kids’ Artwork Gallery Wall
- 7. Botanical Prints Gallery Wall
- 8. Family Photo Gallery Wall
- 9. Monochromatic Gallery Wall
- 10. Gallery Wall with Mirrors
- 11. Typography Gallery Wall
- 12. Abstract Art Gallery Wall
- 13. Geometric Gallery Wall
- 14. Floating Shelves Gallery Wall
- 15. Seasonal Gallery Wall
- Common Mistakes to Avoid When Creating a Gallery Wall
- What types of frames should I use?
- How do I arrange the items on the wall?
- How do I plan the layout of my Gallery Wall?
- How high should I hang my gallery wall?
- How do I incorporate different sizes and shapes in my Gallery Wall?
- Can I mix different types of art and objects in my Gallery Wall?
- How do I update or change my gallery wall?
- Can I create a gallery wall in a small space?
- Conclusion
- You may also be interested in
What is a Gallery Wall?
Firstly, what is a Gallery Wall?
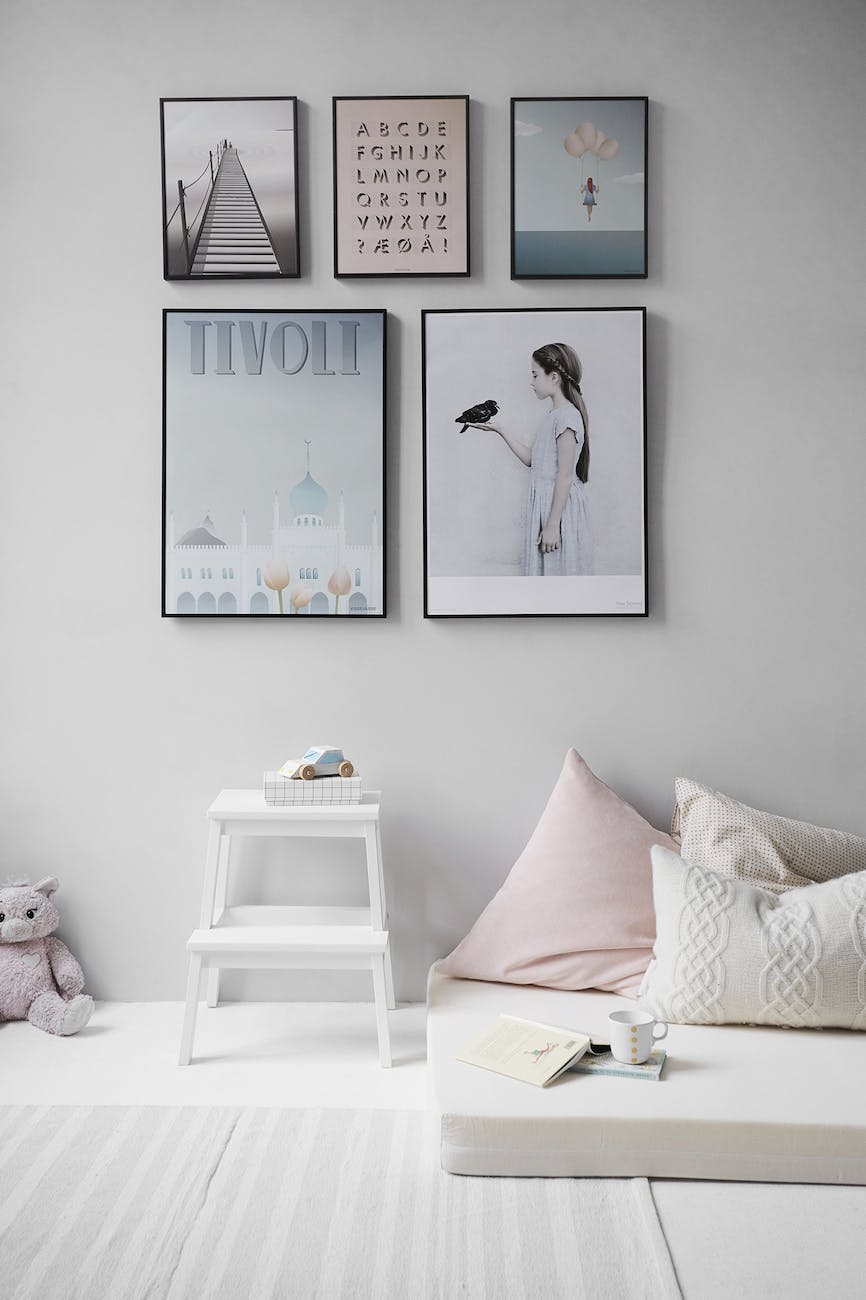
A gallery wall refers to a display of artwork, photographs, prints, or decorative items arranged collectively on a wall, often in a clustered or ‘salon-style’ layout.
It’s a curated collection of pieces that are creatively arranged to create a visually attractive focal point within a room.
Gallery walls can be featured in various areas within a home, such as living rooms, hallways, staircases, bedrooms, or even in home offices or entryways.
They can span entire walls or occupy smaller sections, depending on the available space and desired impact.
Creating a gallery wall involves a thoughtful selection of pieces, meticulous planning of the arrangement, and careful consideration of spacing and visual balance.
Done well, a gallery wall can transform a blank wall into a curated display that adds personality, charm, and artistic flair to any interior space.

Why Create a Gallery Wall?
Creating a gallery wall is more than just hanging pictures on the wall; it’s about telling a story, creating a focal point, and adding character to your home.
Here are some reasons why you should consider creating a gallery wall:
Personal Expression: A gallery wall allows you to showcase your personality, interests, and style through the selection of art, photographs, and other decorative elements.
Focal Point: A well-designed gallery wall can serve as a stunning focal point in any room, drawing attention and sparking conversations.
Flexibility: Gallery walls are versatile and can be customized to fit any space, whether it’s a large living room wall or a small hallway.
Creativity: You have the freedom to experiment with different layouts, frame styles, and art mediums, making each gallery wall unique.
Sentimental Value: Displaying family photos, travel memories, or cherished artworks can add sentimental value to your home.

Planning Your Gallery Wall
Before you start hammering nails into the wall, it’s important to plan your gallery wall carefully. This will help you achieve a cohesive and visually pleasing design.
1. Choose the Right Location
The first step in creating a gallery wall is choosing the right location. Consider the following factors when selecting a spot:
Visibility: Choose a wall that is easily visible and can be appreciated by you and your guests.
Size: Consider the size of the wall and the space around it. A large wall can accommodate a more extensive gallery, while a smaller wall may require a more compact arrangement.
Lighting: Good lighting can enhance the visual impact of your gallery wall. Natural light or well-placed artificial lighting can highlight the details of your artwork.
2. Select Your Artwork and Frames
The next step is to select the pieces you want to include in your gallery wall. This could be a mix of:
Photographs: Family photos, travel snapshots, or vintage pictures.
Artwork: Paintings, prints, sketches, or posters.
Decorative Elements: Mirrors, clocks, or wall sculptures.
When choosing your pieces, consider the following:
Theme: Decide on a theme or style for your gallery wall. This could be a color scheme, a subject matter (e.g., nature, travel), or a particular art style.
Frames: Choose frames that complement each other and the artwork. You can opt for uniform frames for a cohesive look or mix different styles and colors for a more eclectic feel.
3. Plan Your Layout
The layout of your gallery wall is crucial to its overall impact. There are several layout options to consider:
Grid Layout: A symmetrical arrangement with equal spacing between frames. This layout is ideal for a clean, modern look.
Organic Layout: A more freeform arrangement with varied spacing and frame sizes. This layout offers a more relaxed, artistic feel.
Linear Layout: A horizontal or vertical line of frames. This is a simple and elegant option, especially for hallways or narrow walls.

4. Arrange Your Gallery Wall
Once you’ve selected your artwork and planned your layout, it’s time to arrange your gallery wall. Here’s how:
Mock-Up: Before hanging anything, lay out your frames on the floor to see how they look together. You can also create a paper template of each frame and tape them to the wall to visualize the arrangement.
Measure and Mark: Measure the space between frames and mark the placement on the wall using a pencil and a level. This will help you achieve straight lines and even spacing.
Start Hanging: Begin hanging your frames from the center and work your way outwards. Use picture hangers or wall hooks that can support the weight of your frames.
5. Add Finishing Touches
After hanging your frames, step back and assess the overall look. Make any necessary adjustments to ensure the gallery wall is balanced and visually appealing. You can also add decorative elements like wall decals, small shelves, or plants to enhance the design.
How do I choose a theme for my gallery wall?
Choosing a theme can help create a cohesive look for your gallery wall. Here are some ideas for themes:
Your Family Photos
A sentimental display of family portraits and candid moments.
Your Art Collection
A mix of paintings, drawings, and prints by various artists.
Your Travel Memories
Photographs, maps, and souvenirs from your travels.
Color Scheme
A collection of items in a specific color palette.
A Mix of all of the above!
A combination of different styles and subjects that reflect your personality.
Things you need to Create a Gallery Wall
Here are the items that you need to create your gallery wall (the professional way..) :
Measuring Tape and Level
Essential tools for accurately measuring the wall space and ensuring the pieces are hung straight. A level helps in maintaining straight alignment during the hanging process.


Painter’s Tape or Paper Templates
Use painter’s tape or cut out paper templates in the size and shape of your items to plan and experiment with different layouts on the wall before making any holes. This allows you to visualize the arrangement.

Hanging Hardware
Depending on the weight and type of the items, gather appropriate hanging hardware such as picture hooks, nails, screws, anchors, adhesive strips, or wire for secure installation. Ensure they can support the weight of the artwork.


Hammer or Drill
A hammer is suitable for hanging lightweight items with nails, while a drill may be needed for heavier pieces or when using screws or anchors. Choose the appropriate tool for the hanging hardware.

Pencil or Marker
Use a pencil or marker to mark the positions on the wall where you’ll hang the items based on your planned layout.
Step Stool or Ladder
Depending on the height of the wall, have a step stool or ladder on hand to reach higher sections safely when hanging the items.

Cleaning Supplies
Ensure the wall surface is clean and free of any debris or obstructions before starting. Have cleaning supplies ready to prepare the wall for hanging.
Furniture and Decor Accents
Consider the overall space around the gallery wall. Arrange furniture, lighting, plants, or other decor accents to complement and enhance the gallery wall’s visual impact.
How to Create Your Gallery Wall
Step 1: Gather Your Collection
Begin by gathering the artwork, photographs, prints, posters, or decorative items you want to display. This could include a mix of different sizes, styles, and mediums. Try to stick to a cohesive theme.
Here are some resources to get you started :


Step 2: Choose a Theme or Aesthetic
Select a unifying theme or aesthetic that ties your gallery wall together. Whether it’s a color scheme, a specific subject matter, a particular style, or a mix of various elements, having a theme helps create harmony among the pieces.
Step 3: Plan the Layout
Lay out your collection on the floor or a large table to experiment with different arrangements.
Play around with various compositions, considering balance, symmetry, and overall cohesion. Take measurements of your wall and use painter’s tape or paper templates to mark where each piece will go.
Step 4: Prepare the Wall
Clear the wall space and ensure it’s clean and free of any debris or obstructions. This is also the time to patch and paint if necessary. Use the markings or templates on the wall as a guide for hanging.
Step 5: Hanging Your Gallery Wall
Start by hanging the central or focal point piece first. This could be the largest or most significant item in your collection.
Use a level to ensure it’s straight. From there, work outward, using the planned layout as your guide. Maintain proper spacing between pieces, aiming for a visually pleasing arrangement.
Step 6: Adjust and Finalize
Step back periodically to assess the gallery wall’s progress. Make adjustments as needed to ensure the layout is balanced and aesthetically pleasing. It’s okay to rearrange or swap pieces until you achieve the desired look.
Step 7: Secure and Finish
Once you’re satisfied with the arrangement, secure each piece to the wall using appropriate hanging hardware or methods. Ensure items are well-supported and won’t shift or fall.
Step 8: Additional Elements and Styling
Consider adding complementary elements such as wall sconces, shelves, or decorative accents around the gallery wall to enhance its visual impact. Style the area around the wall with appropriate furniture, lighting, or plants to complete the look.
Step 9: Maintenance and Personalization
Regularly dust and clean the artwork to maintain its appearance. Don’t be afraid to update or switch out pieces over time to keep the gallery wall fresh and reflective of your evolving tastes and experiences.
15 Best Gallery Wall Ideas for Your Home
To inspire your creativity, here are 15 gallery wall ideas that you can incorporate into your home décor:
1. Black and White Photography Gallery
Create a sophisticated and timeless look by using black and white photographs. Opt for simple, black frames and arrange them in a grid or organic layout.
2. Eclectic Mix of Art and Photography
Mix and match different art styles, from abstract paintings to vintage posters, and combine them with family photos. Use a variety of frames and sizes for an eclectic, personalized gallery wall.
3. Minimalist Gallery Wall
For a clean and modern look, choose a minimalist approach with simple, uniform frames and a limited color palette. A grid layout works well for this style.
4. Travel-Themed Gallery Wall
Showcase your favorite travel memories with a gallery wall dedicated to your adventures. Include maps, postcards, and travel photos in matching frames.
5. Vintage-Inspired Gallery Wall
Incorporate vintage artwork, old family photos, and antique frames for a nostalgic gallery wall. This works especially well in traditional or rustic interiors.
6. Kids’ Artwork Gallery Wall
Create a fun and colorful gallery wall in your child’s room using their artwork. Use brightly colored frames and arrange the pieces in a playful layout.
7. Botanical Prints Gallery Wall
Bring nature indoors with a gallery wall of botanical prints. Choose earthy, natural frames and arrange the prints in a grid or organic layout.
8. Family Photo Gallery Wall
Create a heartwarming display with a gallery wall of family photos. Mix candid shots with formal portraits, and use a variety of frame styles for a personal touch.
9. Monochromatic Gallery Wall
Stick to a single color palette, such as shades of blue or green, for a cohesive and calming gallery wall. Use frames in varying shades of the chosen color.
10. Gallery Wall with Mirrors
Incorporate mirrors into your gallery wall to add depth and light to the room. Mix mirrors with artwork and photos for a visually interesting display.
11. Typography Gallery Wall
Use inspirational quotes, song lyrics, or meaningful words in your gallery wall. Combine typography prints with other artwork for a modern, stylish look.
12. Abstract Art Gallery Wall
Create a contemporary vibe with a gallery wall of abstract art. Use a mix of bold, colorful pieces and neutral tones for balance.
13. Geometric Gallery Wall
Opt for geometric prints and artwork, and arrange them in a structured, symmetrical layout. This works well in modern or industrial-style interiors.
14. Floating Shelves Gallery Wall
Add floating shelves to your gallery wall to display small decorative objects alongside your artwork. This adds dimension and interest to the display.
15. Seasonal Gallery Wall
Switch up your gallery wall with the seasons. For example, use fall-themed artwork in autumn and winter scenes in the colder months. This keeps your décor fresh and relevant.
Common Mistakes to Avoid When Creating a Gallery Wall
While creating a gallery wall is a fun and creative process, there are some common mistakes to avoid:
Overcrowding: Avoid overcrowding your gallery wall with too many pieces. Leave some negative space to allow each piece to stand out.
Inconsistent Spacing: Ensure that the spacing between frames is consistent to achieve a balanced look.
Not Considering the Room’s Décor: Your gallery wall should complement the overall style and color scheme of the room.
Hanging Frames Too High or Low: The center of your gallery wall should be at eye level for the best visual impact.
Ignoring Scale: Pay attention to the scale of your artwork and the wall. Small pieces can get lost on a large wall, while oversized pieces can overwhelm a small space.
What types of frames should I use?
The frames you choose can greatly impact the overall look of your gallery wall. Here are some options:
Matching Frames
Using identical frames creates a uniform and structured appearance.
Mixed Frames
Combining different frame styles, colors, and sizes can add visual interest and a more eclectic feel.
No Frames
Hanging items without frames, such as canvases or unframed prints, can create a modern and minimalist look.
How do I arrange the items on the wall?
There are several ways to arrange the items on your gallery wall:
Grid Layout
Items are arranged in a precise, grid-like pattern, providing a clean and organized look.
Asymmetrical Layout
Items are arranged in a more freeform manner, creating a dynamic and informal appearance.
Central Anchor
A larger, central piece is used as the focal point, with smaller items arranged around it.
Bottom Line
All items are aligned along a common bottom line, creating a balanced and grounded look.
How do I plan the layout of my Gallery Wall?
Planning the layout before hanging anything is crucial to achieving a well-balanced gallery wall. Here are some steps to follow:
Measure the Wall: Determine the dimensions of the wall space you want to fill.
Create a Template: Use paper cutouts or painter’s tape to outline the sizes of your items and arrange them on the floor or directly on the wall.
Experiment: Move the templates around until you find a layout you like.
Take Photos: Photograph the layout to use as a reference when hanging the actual items.
How high should I hang my gallery wall?
The height at which you hang your gallery wall can impact its overall effect. A general rule of thumb is to place the center of the gallery wall at eye level, which is typically around 57-60 inches from the floor.
How do I incorporate different sizes and shapes in my Gallery Wall?
Mixing different sizes and shapes can add visual interest to your gallery wall. Here are some tips:
Balance Large and Small
Start with the largest pieces and fill in with smaller items.
Create Visual Balance
Distribute sizes evenly across the wall to avoid a lopsided look.
Mix Shapes
Incorporate both rectangular and square frames, as well as circular or oval items, to create a dynamic composition.
Can I mix different types of art and objects in my Gallery Wall?
Absolutely! Mixing different types of art and objects can make your gallery wall more interesting. Consider combining:
- Photographs: Personal photos, professional shots, or vintage prints.
- Artwork: Paintings, drawings, prints, or digital art.
- Decorative Objects: Mirrors, clocks, shelves, or wall sculptures.
- Textiles: Tapestries, fabric swatches, or framed embroidery.
How do I update or change my gallery wall?
Updating your gallery wall can keep it fresh and reflective of your evolving tastes. Here’s how to do it:
- Rotate Items: Swap out a few pieces periodically to change the look.
- Add New Pieces: Gradually add new items that complement the existing layout.
- Seasonal Themes: Change the display to reflect different seasons or holidays.
- Rearrange Layout: Periodically rearrange the layout for a new look without purchasing new items.
Can I create a gallery wall in a small space?
Yes, a gallery wall can work well in small spaces by following these tips:
- Scale Down: Use smaller frames and objects to fit the space.
- Vertical Arrangement: Utilize vertical space to create the illusion of height.
- Focus on Balance: Ensure the arrangement doesn’t overwhelm the space by keeping it balanced and cohesive.
Conclusion
Creating a gallery wall is an excellent way to personalize your home and showcase your style.
With careful planning and thoughtful design, you can create a stunning display that adds character and charm to any room.
Whether you prefer a minimalist grid layout or an eclectic mix of art and photography, the possibilities are endless.
You may also be interested in
How to make your rooms look bigger using mirrors
Blob Mirrors: The Hottest Interior Trend of 2023
Unveiling the Benefits of Stick-On Mirrors
Making the Most of Your Small Entrance way
How to Make the Most of Limited Space : Small Living Rooms
Best Sofa Designs for Small Living Rooms
Mirrors for Your Living Room Wall
A Guide to Runners for Hallways
Must-Have Space Saving Products for Small Apartments
The Benefits of Oversized Mirrors in Bedrooms
The Magic of Peel & Stick Wallpaper – Self Adhesive Revolution


Leave a Reply